BLOG
How to make a Rakhi at home
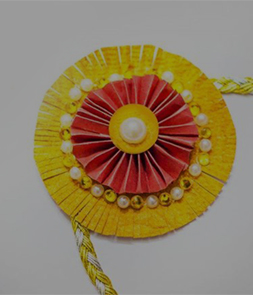
Rakhsha Bandhan – the most beautiful festival celebrating the love between a brother and sister is coming soon. To make the festival extra special, this year why not try something different? Instead to tying a store bought rakhi, make one at home. It’s easy, budget friendly and unique. Let me show you how…
Materials:
• Yellow or Orange handmade paper 5" x 5" square
• Red cardstock 2" x 10" rectangle
• Cartini scissors - we used the Fine Cut Scissors.
• Stick on rhinestones in gold
• One bangle to draw a circle
• Pencil
• Glue
• Zari lace
Steps:
1. Cut out the Orange square & red rectangle and keep it aside
2. Using a bangle for reference, trace a neat circle on the orange paper using a pencil. Remember the size of the rakhi will be determined by how big your circle is.
3. Carefully cut along the edge of the circle using the Fine Cut scissors. This will form the base of our Rakhi
4. Using a pointed scissor, cut small fringes along the outline of the circle by making even cuts about 1/2 " deep. Make sure all fringes are of equal width and are pointing towards the center of the circle. Now our base is ready.
5. Using the long red rectangle, start folding accordion (fan) style along its length. Ensure each fold is as small as you can make and of equal size when compared to the fold before it.
6. Using a strong glue like fevicol or a glue gun stick the ends together to form a zig zag circle.
7. Press one edge slightly inwards to form a circle rosette. Use your forefinger & thumb to hold it in place.
8. Secure it on both sides by sticking a small circular orange paper on both sides. Let it dry completely.
9. Stick it on top of the base circle that we had created earlier.
10. Use another circle and secure the zari lace at the bottom of the orange circle.
11. Embellish the Rakhi with stick on rhinestones and your Rakhi is ready.